s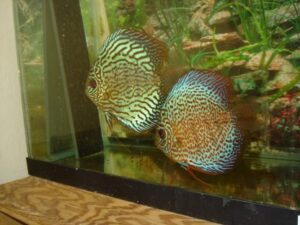
How to breed discus fish is one of the most rewarding experiences you can have in tropical fishkeeping. Discus were once considered extremely difficult to breed, but healthy fish can reproduce successfully when they have compatible partners, suitable water, good food, a clean breeding tank, and a little patience.
Many, many years ago, less was understood about their water requirements, nutrition, and breeding behavior. There was no Internet where you could search for an answer or watch somebody show you what to do. Most of us learned through experience, and sometimes that meant learning the hard way.
I have been keeping and breeding tropical fish since the 1970s. Over the years, I developed my own way of breeding discus and raising the fry. This guide explains what worked for me. Other breeders may do certain things differently, but I’m sharing the method I used successfully.
📢 Affiliate Disclosure: This page contains affiliate links. If you purchase through these links, I may earn a small commission at no extra cost to you. As an Amazon Associate, I earn from qualifying purchases. This helps support FinTastik Tropical Fish and allows me to keep providing free guides for aquarium and tropical fish keepers. I only recommend products I personally believe in and would use myself. Thank you for your support! Read our full affiliate disclosure.
How I First Got Started With Discus
My first discus were four wild brown discus. Wild discus were about all you could buy when I started keeping them in the 1970s. Getting wild discus to breed in an aquarium was difficult, and getting the fry to survive was even harder.
Jack Wattley had discovered a way to remove discus eggs and hatch them artificially without the parents. I knew Jack, but he wouldn’t tell me how he did it. I figured that if he could do it, I could do it too.
I started experimenting and eventually taught myself how to remove the eggs, hatch them, and raise the fry artificially. I could probably tell you a million ways not to do it, lol. However, all that trial and error eventually helped me find a method that worked.
I’ll never forget those four wild brown discus. I can still see them swimming in my mind as clearly as if it were today. Discus is in my blood, if you know what I mean.
How Discus Choose Their Partners
A discus breeding pair consists of a sexually mature male and female that have formed a bond. Simply placing a male and female together does not guarantee that they will become a successful breeding pair.
One of the best ways to get a compatible pair is to raise a group of young discus together and allow them to select their own partners. As they mature, two fish may begin separating themselves from the group and spending more time together.
Signs that two discus may be forming a pair include:
-
- Staying close together
-
- Defending one section of the aquarium
-
- Chasing other discus away
-
- Cleaning a vertical surface
-
- Bowing or displaying toward one another
-
- Shaking or quivering near the spawning area
-
- Becoming more territorial as spawning gets closer
Cleaning a vertical surface is one of the strongest signs. They may clean a breeding cone, aquarium glass, filter tube, piece of slate, or anything else they decide will make a suitable spawning surface.
Two females can sometimes act like a breeding pair and may even lay eggs together. Since there is no male to fertilize them, the eggs eventually turn white. However, don’t assume you have two females because one batch of eggs turns white. Young or inexperienced males may not fertilize the eggs properly during their first few attempts.
Determining the Sex of Discus
It can be difficult to determine whether a discus is male or female by appearance alone. People look at the shape of the head, fins, and body, but these features are not always dependable.
The breeding tubes provide a better indication when the fish are preparing to spawn. The female’s tube is generally larger and more rounded because the eggs pass through it. The male’s tube is normally smaller and more pointed.
The most dependable way to confirm the sexes is to watch them spawn. The female passes over the surface and deposits rows of eggs. The male then follows the same path to fertilize them.
Setting Up the Discus Breeding Tank
I prefer a simple, bare-bottom breeding tank. Without gravel or sand, leftover food and waste are easy to see and remove. Keeping the tank clean is especially important when eggs and young fry are present.
The breeding tank should have:
-
- A mature sponge filter
-
- A breeding cone or another vertical spawning surface
-
- A cover
-
- Gentle and consistent lighting
-
- Easy access for water changes and cleaning
I normally use a sponge filter because it provides biological filtration without producing a strong current. It also does not have a powerful intake that could pull in the fry.
I usually begin with one mature sponge filter in the breeding tank. When the eggs hatch, I add a second sponge filter. That second filter is later moved with the fry when I set up their separate tank.
The pair may ignore the breeding cone and lay eggs on the aquarium glass, filter tube, or another object. If the location is safe, I let them use the surface they selected.
The Correct Breeding Temperature
For breeding discus, I keep the water temperature at 82°F. This is the temperature I have successfully used, and it provides the proper conditions for the pair, eggs, and newly hatched fry.
Keep the temperature stable and avoid sudden changes. Replacement water should be heated to the same temperature before it is added to the aquarium.
Soft Water and TDS for Breeding Discus
I breed my discus in soft water, usually aiming for a TDS, or total dissolved solids, reading of approximately 75 ppm. Discus eggs normally hatch better in relatively soft, low-mineral water.
Some people have naturally soft water coming out of their tap and don’t even realize it. They will tell anybody within earshot that anybody can breed discus in tap water. Well, I and a lot of other people have hard water coming out of our faucets. What works with one person’s tap water may not work with somebody else’s water.
When I first started breeding discus, I used approximately 75% reverse-osmosis water mixed with about 25% hard tap water. Because everybody’s water is different, the percentages are only a starting point. A TDS meter tells you what you actually have after mixing the water.
Over the years, I have successfully used breeding water with a TDS between roughly 75 and 125 ppm. I normally shoot for around 75 ppm, but it does not have to land on one exact number every time.
I also don’t believe in constantly chasing a particular pH. Adding chemicals every time the pH moves can create sudden changes that are worse for the fish than the original reading. Stable, clean water is more important than trying to force the pH to match a supposedly perfect number.
Well water is a different story because its mineral content and other characteristics can vary considerably. Have well water tested before using it for discus.
Conditioning the Breeding Pair
Healthy discus are more likely to spawn successfully and care for their fry. I condition the pair with a varied diet that can include quality flake food, frozen brine shrimp, and prepared frozen beef heart.
Only feed amounts the fish can finish. Rich foods such as beef heart can quickly foul the water if too much is added and allowed to sit on the bottom.
Good food is important, but it will not make up for poor water quality. Clean water, regular maintenance, and a healthy diet work together.
Spawning and Fertilizing the Eggs
Before spawning, the pair will repeatedly clean its selected surface. The female then makes slow passes over it and deposits rows of adhesive eggs. The male follows behind her and attempts to fertilize them.
After spawning, the parents normally remain near the eggs. They fan the eggs with their fins and may remove eggs that have turned white or developed fungus.
A few white eggs do not mean the entire spawn has failed. When most or all the eggs turn white, possible causes include:
-
- The male did not fertilize them properly
-
- The pair is young and inexperienced
-
- The breeding water contains too many minerals
-
- The pair was frightened or disturbed
-
- Fungus spread from infertile eggs
-
- One fish is infertile
-
- Both fish are females
Give a young pair several opportunities before deciding something is wrong. Many pairs improve after a few spawning attempts.
New parents may also eat their eggs. They may be inexperienced, frightened, or disturbed by movement around the tank. Sometimes they eat eggs because those eggs are infertile or beginning to develop fungus.
Keep the area calm and avoid constantly approaching the aquarium. Give the pair a chance to learn.
From Eggs to Wigglers
In my breeding tanks, the eggs hatch in approximately 60 hours. I usually simplify it and say about three days.
The newly hatched discus are called wigglers. They remain attached to the spawning surface while using their yolk sacs. The parents may pick up the wigglers in their mouths and move them to a different spot. This can look alarming, but it is normal behavior.
By approximately the fifth day after spawning, the fry begin becoming free-swimming and start feeding from their parents. The exact timing can vary a little, so don’t treat it like a stopwatch.
Free-Swimming Fry
Newly free-swimming discus do something that makes them different from most aquarium fish. They gather around their parents and feed on a nutritious mucus coating produced by the adults’ skin.
The parents may take turns carrying the fry. The fry gather around one parent while the other rests, and then the adults may switch places.
Watching a cloud of young discus feeding from their parents is one of the most remarkable sights in fishkeeping. This is the point when all the work involved in breeding them begins to feel worthwhile.
Feeding Live Baby Brine Shrimp
About three days after the fry become free-swimming, I begin dropping some live baby brine shrimp over them. At first, they may not eat very many. The idea is to let them see the shrimp moving and encourage them to start trying them.
By around six days of free swimming, the fry should be feeding from their parents and beginning to eat live baby brine shrimp. At around ten days, they should be actively going after baby brine shrimp and starting to accept finely crushed flake food.
I have also ground freeze-dried blackworms in a coffee grinder to make them small enough for the fry. Prepared frozen beef heart can be grated very finely with a handheld food grater.
Only prepare what you need for the feeding. The pieces must be small enough for the fry to eat, and uneaten food should be removed before it affects the water.
My Water-Change Routine
I do a 50% water change every day in my discus breeding tanks. The replacement water is prepared ahead of time and heated to the same 82°F temperature as the breeding tank.
When the eggs hatch into wigglers, I change the routine. I then perform approximately a 25% water change each day using treated hard tap water.
The reason I begin adding hard water is because that is the water I use to raise the discus. By introducing it gradually, the fry become accustomed to their future grow-out water instead of being moved suddenly from soft breeding water into hard water.
I always kept an extra 100-gallon tank or 55-gallon drums filled with hard water for water changes. The containers held water and heaters so the replacement water stayed at the same temperature as the fry and grow-out tanks.
Before using the hard water, I treated it with Seachem Prime water conditioner or Seachem Safe. I also kept separate containers with heated soft or reverse-osmosis water for the breeding pairs.
Separating the Fry From Their Parents
I usually separate the fry from their parents after one month or less. Sometimes I have separated them at around ten days when the fry were still very small.
Before moving them, I prepare another aquarium with the same water conditions. Remember the second sponge filter I added when the eggs hatched? I move that established sponge filter into the new fry tank.
I also move approximately half of the water from the breeding tank into the new tank. I then carefully net the fry and transfer them. This way, the fry move with familiar water and a mature sponge filter instead of being placed into a completely new aquarium.
The following day, I begin adding more treated hard water to the fry tank. In the parents’ tank, I begin adding soft water again so the aquarium will be ready when the pair decides to spawn another time.
Make sure the fry are already eating baby brine shrimp and other prepared foods before removing them from their parents. Very young fry can no longer feed from the parents once they are moved, so they need to be eating well on their own.
Moving the Fry Into Larger Tanks
A successful pair can produce a large number of fry. I sometimes raised around 200 from one spawn, depending on the pair and how many survived.
When I separated very small fry early, I might place them in a 10-gallon aquarium for approximately one week. I then moved them into a 20-gallon tank, followed by a 55-gallon and eventually a 75-gallon grow-out tank as they became larger.
These were temporary steps, not permanent stocking levels. A large number of fry requires frequent feeding, daily cleaning, mature filtration, and regular water changes.
Many of my fry were sold before they ever needed the 55-gallon aquarium. Some people who sold discus would buy an entire tank of young fish from me, grow them to a larger size, and then resell them.
At one time, I had 11 discus breeding pairs producing fry. Managing that many breeders and young fish required a lot of prepared water, sponge filters, grow-out tanks, food, and daily work—but I enjoyed doing it.
Common Discus-Breeding Mistakes
One of the biggest mistakes is changing too many things after one unsuccessful spawn. If you change the temperature, pH, TDS, lighting, food, and aquarium setup at the same time, you will never know what caused the problem.
Make one careful change and observe what happens. Keep track of the water temperature, TDS, water changes, hatch rate, and behavior of the parents.
Other common mistakes include:
-
- Using water that is too hard for the eggs to hatch
-
- Allowing uneaten food and waste to collect
-
- Disturbing a new pair too frequently
-
- Using a filter with a dangerous intake
-
- Moving fry into water with a different temperature or chemistry
-
- Feeding too much food at one time
-
- Crowding growing fry without enough water changes
-
- Giving up on a young pair after one failed spawn
Discus pairs often become better parents with experience. Be patient and give them time to learn.
Final Thoughts
Breeding discus does not have to be the impossible challenge it was once believed to be. The main ingredients are a compatible pair, soft breeding water, a stable temperature of 82°F, good food, clean aquariums, regular water changes, and patience.
My method developed from many years of experimenting, making mistakes, and trying again. I did not have the Internet or somebody standing beside me explaining every step. I learned what worked through experience.
Allow your discus to choose their own partners when possible. Give them a simple breeding tank, keep their water clean and stable, and don’t start changing everything because one spawn fails.
Watching the eggs hatch, seeing the wigglers become free-swimming, and then watching a cloud of fry feeding from their parents is something you never forget. Discus breeding takes work, but for me, it has always been worth it.
Join the conversation in one of our Facebook Groups — share photos of your aquascape, ask questions, and connect with other tropical fish enthusiasts!
For Advanced Tropical Fish & Discus Keepers:
👉 JOIN DISCUS WHATEVER ON FACEBOOK
For Beginner Fish Keepers:
👉 JOIN BEGINNERS FISH KEEPERS ON FACEBOOK
We’d love to see photos of your aquascape — share them in the group that fits you best!